
Vertex² User Manual · PDF pages 26–29
Web Server – HDR / DV Section
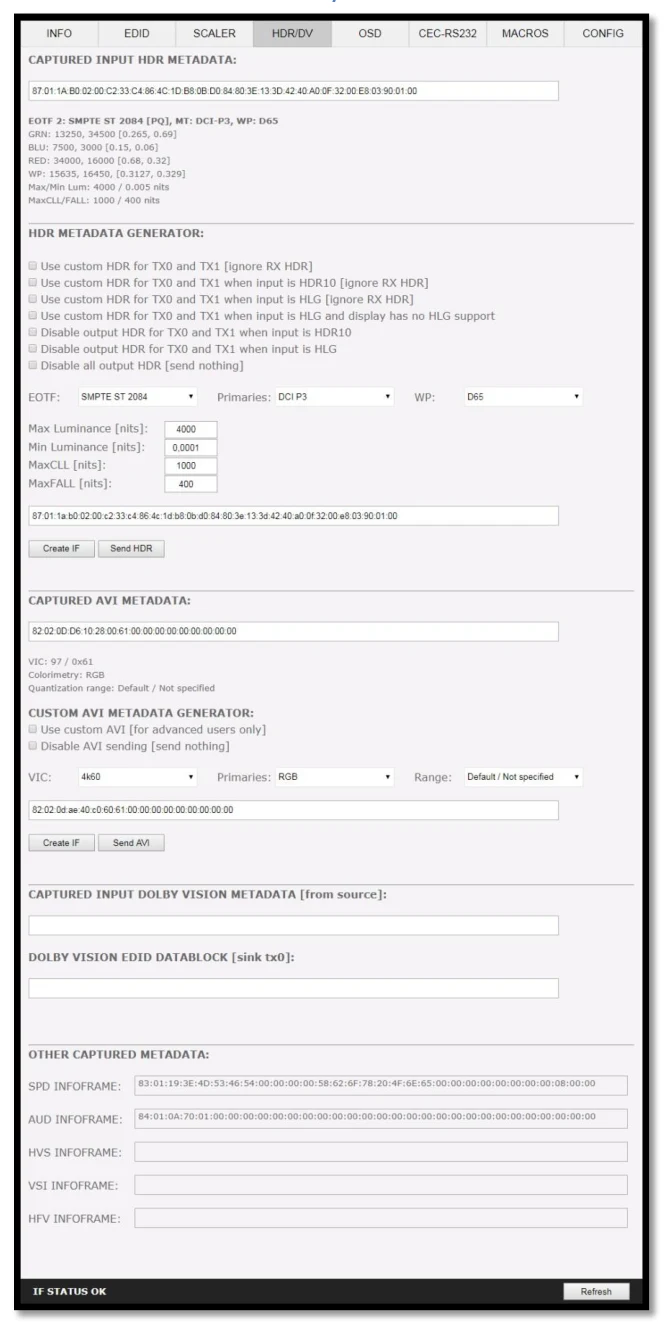
[CAPTURED HDR METADATA] If the source at input is sending HDR InfoFrame metadata then the information is captured, extracted and displayed in this text box. HDR metadata is also deciphered and displayed in human readable format.
[CUSTOM HDR METADATA GENERATOR] This section will allow you to create your own custom HDR metadata and inject it on the current signal by adding it or replacing the existing HDR metadata.
[Use custom HDR for TX0 and TX1] Unchecked by default, once activated it will turn ON the HDR mode of any HDR display. Upon clicking Use custom HDR for TX0 and TX1 the CUSTOM HDR IF that is defined by dropdowns and input fields below and then created [Create IF] and displayed in the text box in HEX format gets sent. This way you can define what the InfoFrame actually is. This is stored also in Vertex² and is persistent over hot-plugs and power cycles. If incoming signal is already HDR, the original HDR metadata that comes with will be ignored [ignore RX HDR].
[Use custom HDR for TX0 and TX1 when input is HDR10] Unchecked by default, once activated it will turn ON the HDR mode of any HDR display only if incoming signal is already HDR, the original HDR metadata that comes with will be ignored [ignore RX HDR].
[Use custom HDR for TX0 and TX1 when input is HLG] Unchecked by default, once activated it will turn ON the HDR/HLG mode of any HDR/HLG display only if incoming signal is already HLG, the original HLG metadata that comes with the input signal will be ignored [ignore RX HLG]. Ex: render HLG content on HDR display.
[Use custom HDR for TX0 and TX1 when input is HLG and display has no HLG support] Unchecked by default, once activated it will turn ON the HDR mode of any HDR/HLG display only if incoming signal is already HLG and TV have no support for it. Ex: If two TVs are connected and one if HLG and other non- HLG. Then if you turn off the HLG TV the metadata will be automatically changed.
[Disable output HDR for TX0 and TX1 when input is HDR10] Unchecked by default, once activated Vertex² will intercept and cancel all incoming HDR10 metadata, HLG metadata will still pass-thru.
[Disable output HDR for TX0 and TX1 when input is HLG] Unchecked by default, once activated Vertex² will intercept and cancel all incoming HLG metadata, HDR10 metadata will still pass-thru.
[Disable all output HDR] Unchecked by default, once activated Vertex² will intercept and cancel all incoming HDR metadata. [send nothing]
Note: Disable HDR modes was introduced to allow some JVC PJ owners to apply their own Gamma curves for HDR content and allow their PJ Dynamic Iris to work when content is HDR and/or HLG. They can be used with others display that allow custom Gamma Curve to be applied on incoming signal or to boost nits value for some LG TVs or to render HLG content on HDR display, etc..
[EOTF] Select between SDR Luminance Range, HDR Luminance Range, HLG ITU-R BT.2100-0 or SMPTE ST 2084 values to be used in the custom HDR metadata creation.
[Primaries] Select between DCI P3, ITU-R BT 709-5 or ITU-R BT2020-2 values to be used in the custom HDR metadata creation.
[White Point] Select the white point value to be used in the custom HDR metadata creation.
[Max Luminance] Select the Max Luminance value to be used in the custom HDR metadata creation (valid from 1 to 65535)
[MaxCLL] Select the MaxCLL value to be used in the custom HDR metadata creation (valid from 1 to 65535)
[Min Luminance] Select the Min Luminance value to be used in the custom HDR metadata creation (valid from 1 to 65535)
[MaxFALL] Select the MaxFALL value to be used in the custom HDR metadata creation (valid from 1 to 65535)
[Create IF] Use the previous defined values to create the Custom HDR metadata.
[Send HDR] Send the custom created HDR metadata. Please note that Enable Custom HDR or any Custom HDR modes must be activated first, to stop the sending of the custom HDR metadata, uncheck Enable Custom HDR. If Enable Custom HDR is activated then by pressing the Send HDR button, the metadata injection does not stop, it just changes values, useful to avoid TV resync.
[Default Value] Restore the default HEX value of the custom HDR metadata.
[CAPTURED AVI METADATA] If the source is sending AVI infoFrame then the information is captured, extracted and displayed in this text box on GUI. HEX value is deciphered and VIC, Colorimetry and Range are exposed in human readable format.
[CUSTOM AVI INFOFRAME GENERATOR] Build and send out any custom AVI Infoframe of your choice.
[Use custom AVI] Upon clicking Use custom AVI, the IF that is defined in the Custom AVI text box gets used. This way you can define what the InfoFrame actually is. This is stored also in Vertex² and is persistent over hotplugs and power cycles. This way customer can for example activate BT2020 mode in the TV even though content doesn't sent the correct InfoFrame. The AVI mod is really meant for advanced users only because incorrect values can blank the screen and since the settings are saved even power up won't help until reset.
[Disable AVI] When checked, Disable AVI will prevent AVI InfoFrame from source to reach the connected sink at Vertex² output and also stop sending Custom AVI if set previously. This feature can be useful for some DVI display or some monitor that do not work well when receiving an AVI InfoFrame.
[VIC] Select the VIC code to use in the Custom AVI Hex field.
[Primaries] Select the Primaries value to use in Custom AVI Hex field
[Range] Select the range value to use in the Custom AVI Hex field.
[Create IF] Use the previous defined values to create the Custom AVI metadata.
[Send AVI] Replaces the current incoming AVI with the custom defined one in the text box. This way customer can for example activate BT2020 mode in the TV even though content doesn't sent the correct InfoFrame. This string is also saved in Vertex² and is persistent over hotplugs and power cycles. The AVI mod is really meant for advanced users only because incorrect values can blank the screen and since the settings are saved even power up won't help until reset. Please note that upon clicking, Use Custom AVI will automatically send the current stored AVI metadata value, to stop the sending of the custom AVI infoframe, uncheck Use Custom AVI. If Use Custom AVI is activated then by pressing the Send AVI button, the infoframe injection does not stop, it just changes values, useful to avoid TV resync.
[CAPTURED INPUT DOLBY VISION METADATA] Dolby ID and HEX data from the DV source.
[DOLBY VISION EDID DATABLOCK] Vertex² will automatically sniff, display and save any Dolby Vision mandatory string from a connected sink at TX0 output. Once stored, this mandatory string can be used in EDID">Automix to ensure that the DV stream from the source is compatible with the sink. Once the DV string of a display is saved, you can insert other equipment like an AVR in between in the chain and still have the right DV signal passthru to the sink. Additionally, the datablock value is fully deciphered in human readable format.
[SPD INFOFRAME] Display the captured Source Product InfoFrame.
[AUD INFOFRAME] Display the captured Audio Format information, if PCM this usually gives the sample rate and number of speakers, if bitstream then usually this infoframe just inform the default which is “refer stream header”.
[HVS INFOFRAME: HDMI VENDOR SPECIFIC] Display HDMI Vendor Specific InfoFrame.
[VSI INFOFRAME: VENDOR SPECIFIC] Display HDMI2.0 version of HDMI VSIF
[HFV INFOFRAME: HDMI FORUM VSIF] If the source is sending Vendor Specific Infoframe then the information is captured, extracted and displayed in this text box on GUI.
[REFRESH] Refresh the current page.